
What is the 1IN4 festival?
The one in four is a 1 week long festival which features films that explores the effect of mental health issues. The whole aim of the festival is to raise the awareness of and stamp out the stigma in which associate with mental health. The festival also celebrate differences to inspire positive changes.
Breathe
“Breathe” is a 2017 biographical drama directed by Andy Serkis in his directorial debut, from a screenplay by William Nicholson.
After being paralyzed by Polio at the age of 28, Robin Cavendis (Andrew Garfield) was confined to bed and was only given a month to live.
Against all advice, Robin’s wife Diana (Claire Foy) brings him home where her devotion; intimacy and witty determination transcends his disability and sets him free.
–
Breathe- poster 1

I have created this poster on the program “Photoshop”.
To create this poster I have selected pictures from google images, copied it then using Alt + tab, I quickly switched from program to program or pages to pages. Using Ctrl v, I pasted the image onto my Photoshop page. I repeatedly continue this process until I was happy with the amount of pictures that i had.

After pasting all my photos onto Photoshop, I re-arrange the pictures and resizing them using Ctrl T (to resize) and shift to ensure that the images enlarges instead of widening outwards or inwards.
Once I was happy with how my pictures are arranged, with the erase tool (decrease the opacity and hardness of the erase tool), i then begin to erase out the harsh borders around the images to soften up the edges to give that blending effect. I did this repeatedly with all the images until I was satisfied enough with the outcome.
To ensure that my outcome becomes successful, I had to make sure that the images are overlapping one another so that no white background could be seen.
Lastly, I’ve added the Uclan logo as well as the 1IN4 in which I’ve found on google images. To top everything off using the text tool, I have added text within my poster to make it appear more professional and complete.
Breathe- poster 2
–

I have made this poster on Photoshop. To create this I’ve used the skills that iv’e learnt from the first practice poster such as the keyboard shortcuts (ctrl t, ctrl z) and how to add text and fade out pictures using the erase tool.
The thing that i really like about this is although it’s simple in terms of looks as well as the proceed the final outcome, it’s still works and is effective.
1IN4 Uclan film festival poster
–

Evaluation
This is my 1IN4 festival poster that Iv’e designed on Photoshop. I’ve used what I have learnt from the lesson and combined it with skills that I’ve self taught. What i like best about this design is that although it’s simplistic, it looks professional. In general I’m generally happy about the outcome and would definitely used these skills that I’ve learnt for my future works.
Stephanie Jung

Stephanie Jung uses what looks like a photograph but is placed on top of each other to create this shaken effect. Her pieces are usually city landscapes and some sections are even blurred out or faded. Stephanie uses a range of perspectives, distance and even vanishing points in her work.
In this work in particular, the artist uses bright vibrant colours, particularly the lights, however over all, the artist tends you uses strong colours such as black, white and purple.
Michael Tompsett
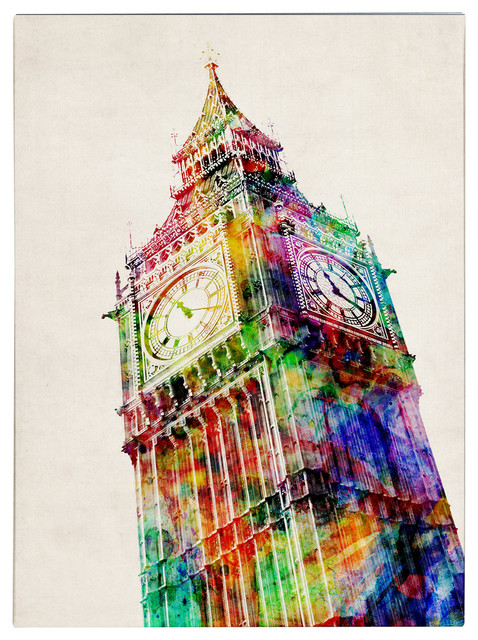

Michael Tompsett’s work usually involves buildings close up photographed at an irregular angle. She overlays rainbow like effects to create these textures within the famous buildings.
Tomsett usually prefers using bright and vibrant sharp colours in her work such as yellow, blue red etc…
Photoshop (Trying out techniques).
This is a work inspired by Stephanie Jung and i first started by taking a picture of a building in Preston and then took this picture within Photoshop.
I have then adjusted the hue, saturation and colour of the image until I was happy with the Outcome. I’ve done this by going into adjustments then Hue/saturation.lastly I have over lay the same image on top of each other and then changed the opacity of those image to create this almost blurred effect. I’ve moved some of the images to also gibe this shaken effect just like the work of Stephanie Jung.
Final outcome

Evaluation
Over all, I am generally happy with the outcome however, What i should’ve done is to make the colours more saturated and vibrant particularly the sky to make it stand out and not look so dull. I really like the over all technique of this project as it was easy to do however, I did find myself lost because of the amount of layers doing this technique included. I think having so many layers on top of each other is also another reason to why the colours may looked faded out. To fix this, I should create less layers and name the layers so that they colours be easy to identify.
This is a diagram that I have made on the uses of the Marqueen and lasoo tool near the beginning of the lesson.

- I went on google images, and searched for “abandoned farmhouse”. I then went on tool and changed the images size to large, copied and pasted it and transferred it into Photoshop.

2. After transferring my image onto Photoshop, using the keyboard shortcut “ctrl + u” I’ve changed the saturation of the image to almost gray scale and also darken my brightness as well as messing around with the hue until i was satisfied with the outcome.

3. I then created a new layer above the image, and use the gradient tool at the side to create this vignette appearance. To blend the vignette with the image, I used the blending mode on Photoshop and scrolled down until i was satisfied with the effect.

4. To create this texture effect, I went back onto google images and searched up “rusting texture” and picked out the image that I think will go well with my image. I’ve then created a new layer on Photoshop and pasted my new image onto it and enlarge the picture until it completely fills the page using ctrl v + shift then dragging it outwards. Using ctrl U keyboard shortcut, I once again changed the saturation of the image until I was satisfied with the outcome. To finish off, I went through the blending tool until it fits with the image.

5. Lastly, I created yet another layer (4th layer), and used the bucket fill tool, filling the background black. I then went on filter, texture , and vertical. This creates the vertical grain effect in the image to make my image look more vintage. To finish the entire image off, I then changed the opacity and the fill of the image to blend my grains into the image.

OUTCOME

evaluation
This was genuinely interesting. I’m very new to Photoshop and even though I find it quite confusing at first and difficult to find my way around the app.
The final outcome was definitely a success and I’m proud of how it came out. What I could do to further improve this feeling of an old image is to get rid of the newly modern cars in the background of the image. The old broken down bar really worked with this technique but it was definitely ruined by the cars. To fix this problem I could use the clone tool to clone the bushes then hide the cars behind the bushes.
I definitely feel that I’ve learnt a lot learning this technique and I’ll definitely use it in the future for my later work.
